結論先講
你寫 .button { color: red; } 但樣式沒生效。Debug 後發現是別處的 #app .button { color: blue; } 贏了。這不是 bug,是 Specificity(優先級) 在運作。
搞懂 Specificity 你會:
- 不再亂加
!important(大家都加就大家都輸) - 知道為什麼第三方 CSS 會蓋掉你的
- 會用
@layer(現代 CSS 的乾淨解法)
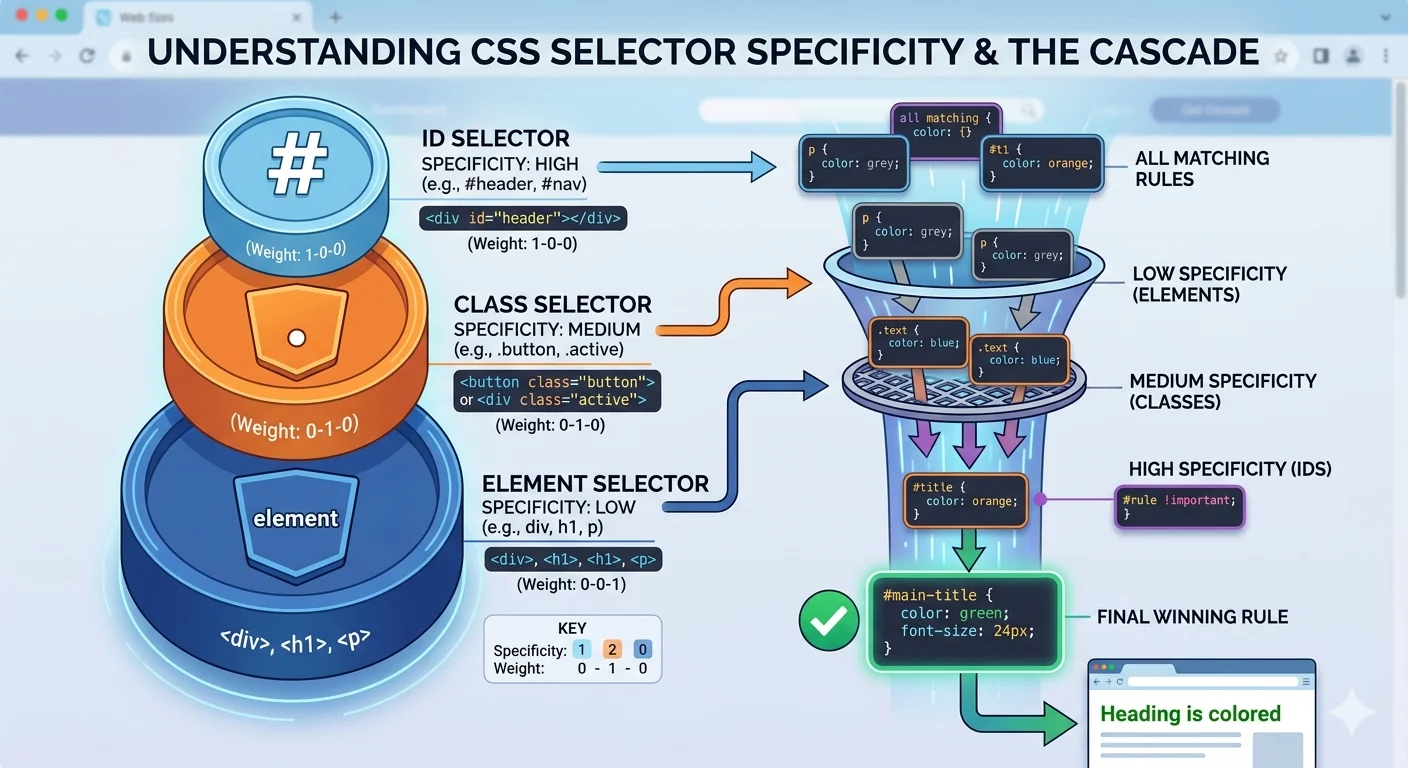
CSS 決定「誰贏」的順序:來源 → Cascade Layer → Specificity → 出現順序。這篇逐層拆解。
Cascade:四層判斷順序
CSS 有多個來源的規則同時生效時,瀏覽器用這個順序決定哪個贏:
- 來源(Origin)+ 重要性(Importance)
- Cascade Layer(@layer)
- Specificity(優先級)
- 出現順序(source order)
逐層往下比,上層贏就決定,不會看下層。
Step 1:來源 + 重要性
| 順序 | 來源 | 例子 |
|---|---|---|
| 1(輸) | 瀏覽器預設 | user-agent stylesheet |
| 2 | 使用者樣式 | 瀏覽器 extension 的 CSS |
| 3 | 作者樣式 | 你寫的 CSS |
| 4 | 作者 !important | .foo { color: red !important; } |
| 5 | 使用者 !important | 無障礙覆寫 |
| 6(贏) | 瀏覽器 !important | 極少見 |
你寫的 CSS 通常是 3。加 !important 升到 4。
Specificity(優先級計算)
同一來源的多個規則,看 specificity(特異性)分數。
計分方式(三欄:A B C)
用 a, b, c 三欄記分(不是十進位):
| 選擇器類型 | 加分位置 | 例子 |
|---|---|---|
| ID | A | #header → (1,0,0) |
| Class、屬性、偽類 | B | .btn、[type=text]、:hover → (0,1,0) |
| 元素、偽元素 | C | div、::before → (0,0,1) |
比較規則
從左到右比較:
- (0,1,0) > (0,0,5)(B 贏過 C,即使 C 多)
- (1,0,0) > (0,99,99)(A 永遠贏 B)
實例計分
/* 選擇器                  分數         */
div                        /* (0,0,1) */
.btn                       /* (0,1,0) */
.btn:hover                 /* (0,2,0) */
.card .btn                 /* (0,2,0) */
.card > .btn               /* (0,2,0)  -- 組合子不加分 */
#app .btn                  /* (1,1,0) */
#app .card .btn            /* (1,2,0) */
div.btn                    /* (0,1,1) */
[data-theme=dark] .btn     /* (0,2,0) */
.btn.primary.large         /* (0,3,0) */
特殊情況
*不加分:(0,0,0):is()/:has()/:not()本身不加分,但取括號內最高的加分:is(.a, #b)算 (1,0,0):not(.a)算 (0,1,0)
:where()永遠 (0,0,0) — 這是現代 CSS 的「低優先級」工具
!important:為什麼不要亂用
!important 把規則從「作者層」升到「作者 !important 層」(Cascade Step 1 的第 4 格)。
壞處
- 別人要蓋掉你的
!important,只能也用!important→ 開始軍備競賽 - 三個月後你自己要改也蓋不掉,最後改成
!important !important(開玩笑,但大家的心態) - 整個專案的 CSS 變成誰的
!important多誰贏
合理使用時機
- Utility CSS(Tailwind 的
!prefix)— 設計就是要覆寫 - Overriding 第三方 CSS 且無法改源碼
- Debug 臨時測試
一般寫 CSS 不該用
永遠用「提高 specificity」或「改用 @layer」來代替 !important。
@layer:現代 CSS 的救星
Cascade Layers 讓你明確控制哪層 CSS 贏,不靠 specificity。
@layer base, components, utilities;

@layer base {
  button { background: gray; }  /* specificity 0,0,1 */
}

@layer components {
  .button { background: blue; }  /* specificity 0,1,0 */
}

@layer utilities {
  .bg-red { background: red; }   /* specificity 0,1,0 */
}
即使 specificity 相同,後宣告的 layer 贏(utilities 贏 components 贏 base)。
沒進 layer 的規則呢?
@layer base { .btn { color: blue; } }

.btn { color: red; }  /* 沒在 layer 裡 */
沒進 layer 的規則永遠贏過 layered 規則(即使 layered 宣告在後)。用這個特性放「絕對要贏」的規則。
實戰:為什麼要用
傳統 CSS 的痛點:
/* 載入順序:reset → components → my-override */

/* reset.css */
button { padding: 0; }

/* components.css */
.primary-btn { padding: 10px; }  /* specificity (0,1,0) 贏 reset */

/* my-override.css */
button.primary-btn { padding: 20px !important; }  /* 只能這樣蓋 */
用 @layer 後:
@layer reset, components, overrides;

@layer reset { button { padding: 0; } }
@layer components { .primary-btn { padding: 10px; } }
@layer overrides { button { padding: 20px; } }  /* 自動贏,不用 !important */
乾淨又可預測。現代瀏覽器都支援(Chrome 99+、Firefox 97+、Safari 15.4+)。
出現順序(source order)
前兩層都平手時,後面的贏:
.btn { color: red; }
.btn { color: blue; }  /* 贏:出現在後面 */
這就是為什麼 reset.css 要最先載入、overrides.css 最後載入。
Debug Specificity 的工具
Chrome DevTools 的 Computed 面板
選元素 → Styles 面板:
- 劃掉的規則表示被其他規則蓋掉
- 右邊顯示每條規則來自哪個檔案跟行數
- 按 F12 → Computed 看最終值
VS Code 的 Specificity 插件
CSS Specificity 擴充套件直接在選擇器旁顯示分數,寫 CSS 時即時提醒。
線上計算器
specificity.keegan.st — 貼選擇器算分。
實戰策略
策略 1:降 specificity,用 class
❌ 避免:
div#app .card ul li a { color: blue; } /* (1,2,3) 很難蓋 */✅ 偏好:
.card-link { color: blue; } /* (0,1,0) 容易管理 */策略 2:用 :where() 包
/* 0 specificity,永遠好蓋掉 */
:where(h1, h2, h3, h4) { font-weight: 600; }
策略 3:@layer 管組織
@layer reset, theme, components, utilities;用 layer 管優先,不靠 specificity。
策略 4:選擇器命名盡量單一
BEM 命名法:.card__title--large 避免巢狀選擇器。
實戰 Checklist
- 避免 ID 選擇器(太高 specificity)
- 避免深度巢狀(
.a .b .c .d) - 不要隨便用
!important - 現代專案用
@layer組織 - 重設 CSS 用
:where()保持 0 specificity - Debug 時看 DevTools 的 Computed + Styles
相關文章
- Box Model — CSS 基礎
- Flexbox
- CSS 子 Roadmap
- Frontend Roadmap